After we know how Laravel works in the Laravel tutorial for beginners part 3, now we will learn how to make tests and how to run tests, that is called TDD (Test driven development). Testing or TDD (Test driven development) is a process that used for application development, where we need to testing the code we write so we can fix errors that occur.
Table of Contents :
- Testing
- Running The Tests
Testing
Laravel uses PHPUnit to implement its unit tests, there are 2 types of tests in Laravel namely
There are 2 types of tests in Laravel, that is :
- Unit Tests
- Feature Test or Integration Test
1. Unit tests
For Unit Tests, we can create a unit test class like using PHP Unit, by creating a class derived from PHPUnit\Framework\TestCase, if we need to make a test without using the Laravel Framework then we can simply create a Unit Test.
How to create Unit Tests:
If you want to make a Unit Test, we can use the command: “php artisan make: test testname –unit” then this command will automatically create a Unit Test in tests/Unit folder.
Example: open a terminal then type “php artisan make:test Example Contohunittest –unit”
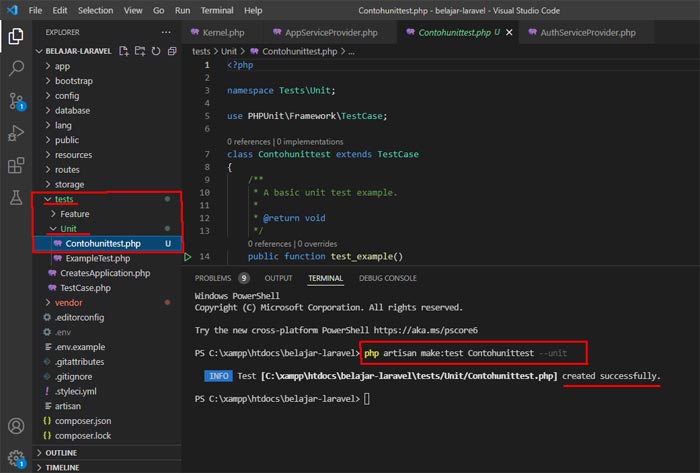
After we run the command above, we have succeeded to create a Unit Test with the name “Contohunittest” whose file is in tests/Unit/Contohunittest.php as shown above, if we open the file tests/Unit/Contohunittest.php as shown below

2. Feature test / Integration test
Laravel has features that make it easier for us to make integration tests. The difference is with Unit Tests, in the Laravel integration test application can be accessed easily, for example we later want to call Database, Controller and others. To make an Integration Test, we simply need to create a derived class from illuminate\Foundation\Testimg\TestCase, in the integration test process it will be slower than because we have to wait for the laravel framework to load first, but if we want to use laravel features then you must use the Integration Test .
How to make integration tests
To making an Integration Test, we can do it manually or we can use the artisan file with the command: “php artisan make: test Namatest” this artisan command will automatically create an Integration Test then it will go into the tests/Features folder.
Example: open a terminal and type the command “php artisan make:test Contohintegrationtest”
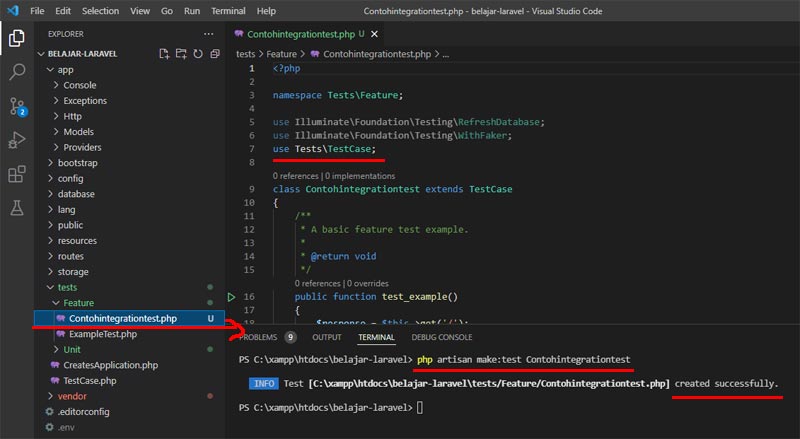
We have succeeded to creating an integration test / feature test with the name “Contointegrationtest” whose file is in the tests/Feature/Contohintegrationtest.php folder as above, if you open the file it looks like the image below
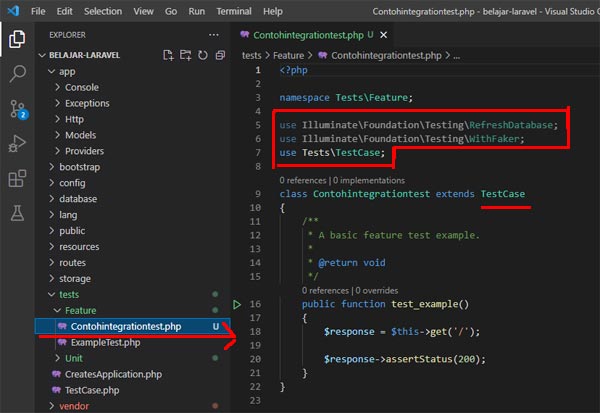
from the image above, please note the code “use Tests\TestCase;” this code means the integration test/feature test that we created uses TestCase (Tests\TestCase) Laravel Framework. that is different with the Unit test that we first tested/Unit/Contohunittest.php which uses PHPUnit (use PHPUnit\Framework\TestCase; )
If we compare it will look like the image below

So,The conclusion
- Integration test / Feature test uses TestCase -> Tests\TestCase (use Tests\TestCase;) The TestCase uses Laravel’s TestCase Framework
- Unit Test uses TestCase -> PHPUnit\Framework\TestCase (use PHPUnit\Framework\TestCase;) The TestCase does NOT use Laravel Framework TestCase
Running Tests
To run tests, we can use PHPUnit as usual or if we run all tests, we can use the artisan file with the command “php artisan test”.
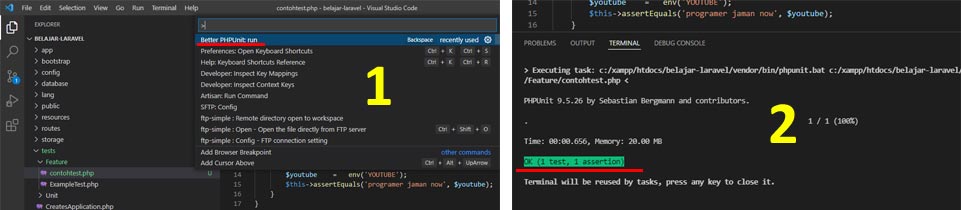
If you are using VScode you can install “Better PHPUnit” extensions to run the test, as shown below

to run a test with Better PHPunit, open your test file then press the ctrl+shift+p key on the keyboard then select “Better PHPUNIT: run” as shown in pictures 1 and 2 below
That’s the tutorial for learning Laravel part 4, see you in the tutorial for learning Laravel part 5, I hope this is useful.
You may want to take a look at other laravel tutorials :
 Environment and Configuration in Laravel for beginners
 Environment in Laravel for beginners
 Laravel tutorial for beginners part 4 (Test driven development)
 Laravel tutorial for beginners part 3 (System MVC, Kernel dan Service Provider)
 Laravel tutorial for beginners part 2 (mode development,file artisan,GIT)
 Laravel tutorial for beginners part 1
 Laravel 9 and Composer installation
 PHP Laravel 9 CRUD Web App Tutorial with MySQL